Mint and Sumac

  • Blog
  • About
  • Recipes
  • Contact
DSC_0169.jpg

Poached Quince

November 08, 2019 by Gizem in Dessert

It has been a while. I guess, all I can say is, life happened. We have been in Seattle for almost two years and being workaholics, we have buried ourselves in our jobs. With the fall months rolling in, I got reminded of how much I miss cooking and sharing recipes on this blog, both for myself and for everyone who has been following. So I am back and this time, I plan to stick around.  

I know many of you (including me!) don’t like to scrolling ten minutes through a giant blog post to finally reach to the recipe but this is a blog and I have been gone for a long time so some updates are in order.

This year, we traveled to South Korea where we ate so much and everything (would anyone like posts on our trips with a focus on food?) and to Isle of Skye that took our breath away with its amazing scenery. I started lifting weights again with amazing Brent Hruska of Barbell Vitality and not only I can now deadlift 170lbs but I also lost 18lbs along the way! Goodbye FL pounds I gained in the year we lived there. We have been to many national parks and had a great camping trip in Crater Lake Natinoal Park with a close group of friends. I am not an outdoorsy person but I discovered a love of cooking on open fire and will be sharing recipes for camping in the future for sure. I have been on a ton of trips for work, to DC, San Francisco, Orlando and more San Francisco, which allowed me to see family and friends while also working hard. And Cesar got a new job and he is loving it! There is more to come this year with my parents visiting for the holidays and more travels but I’ll save those for later.

Fall came to Seattle very early this year, I for one, wasn’t ready for it. But then when I saw all the amazing fall bounty at the University Farmers Market I got in the mood for cooking again. If you are still stuck in the summer months, this is the perfect dessert that will get you in the mood for fall, especially if you are not ready for the pies and not into all the pumpkin spice craziness.

Quince is a fruit that comes from the same family as apples and pears. But unlike apples and pears, most types of quince are not edible raw. They are too sour, hard and astringent to be tasty unless cooked. In Turkey (which has the highest production of quince to my knowledge), we make jams, pastes and desserts with quince. This recipe is a classic and a family favorite. It is light and not too sweet, plus, it looks quite elegant so you can knock everyone’s socks off if you make some for your various Thanksgiving festivities.

Yields: 8 servings Time: 45 minutes

Ingredients

4 quinces

Half a lemon’s juice

12 tablespoons of granulated sugar (3 tbsp per quince)

1 cinnamon stick

3-4 cloves (or 1 teaspoon ground cloves)

For serving:

1/4 cup chopped walnuts

Crème fraîche (or clotted cream)

Preparation

1. Fill a large bowl with cold water and squeeze half a lemon’s juice. Quince turns brown very rapidly once cut and peeled. To avoid this, you will be placing the cleaned quinces inside the water. 

Do steps 2-4 one by one for each quince to avoid browning.

2. First cut the quince in half along its width. If done correctly you should see the seeds in the center, forming a flower-like shape. Cutting them this way makes cleaning process much easier.

3. Using a spoon and/or paring knife, carve out all the seeds. DO NOT discard the seeds. We will use them later. Set them aside.

4. Peel the quince and place into the bowl filled with cold water.

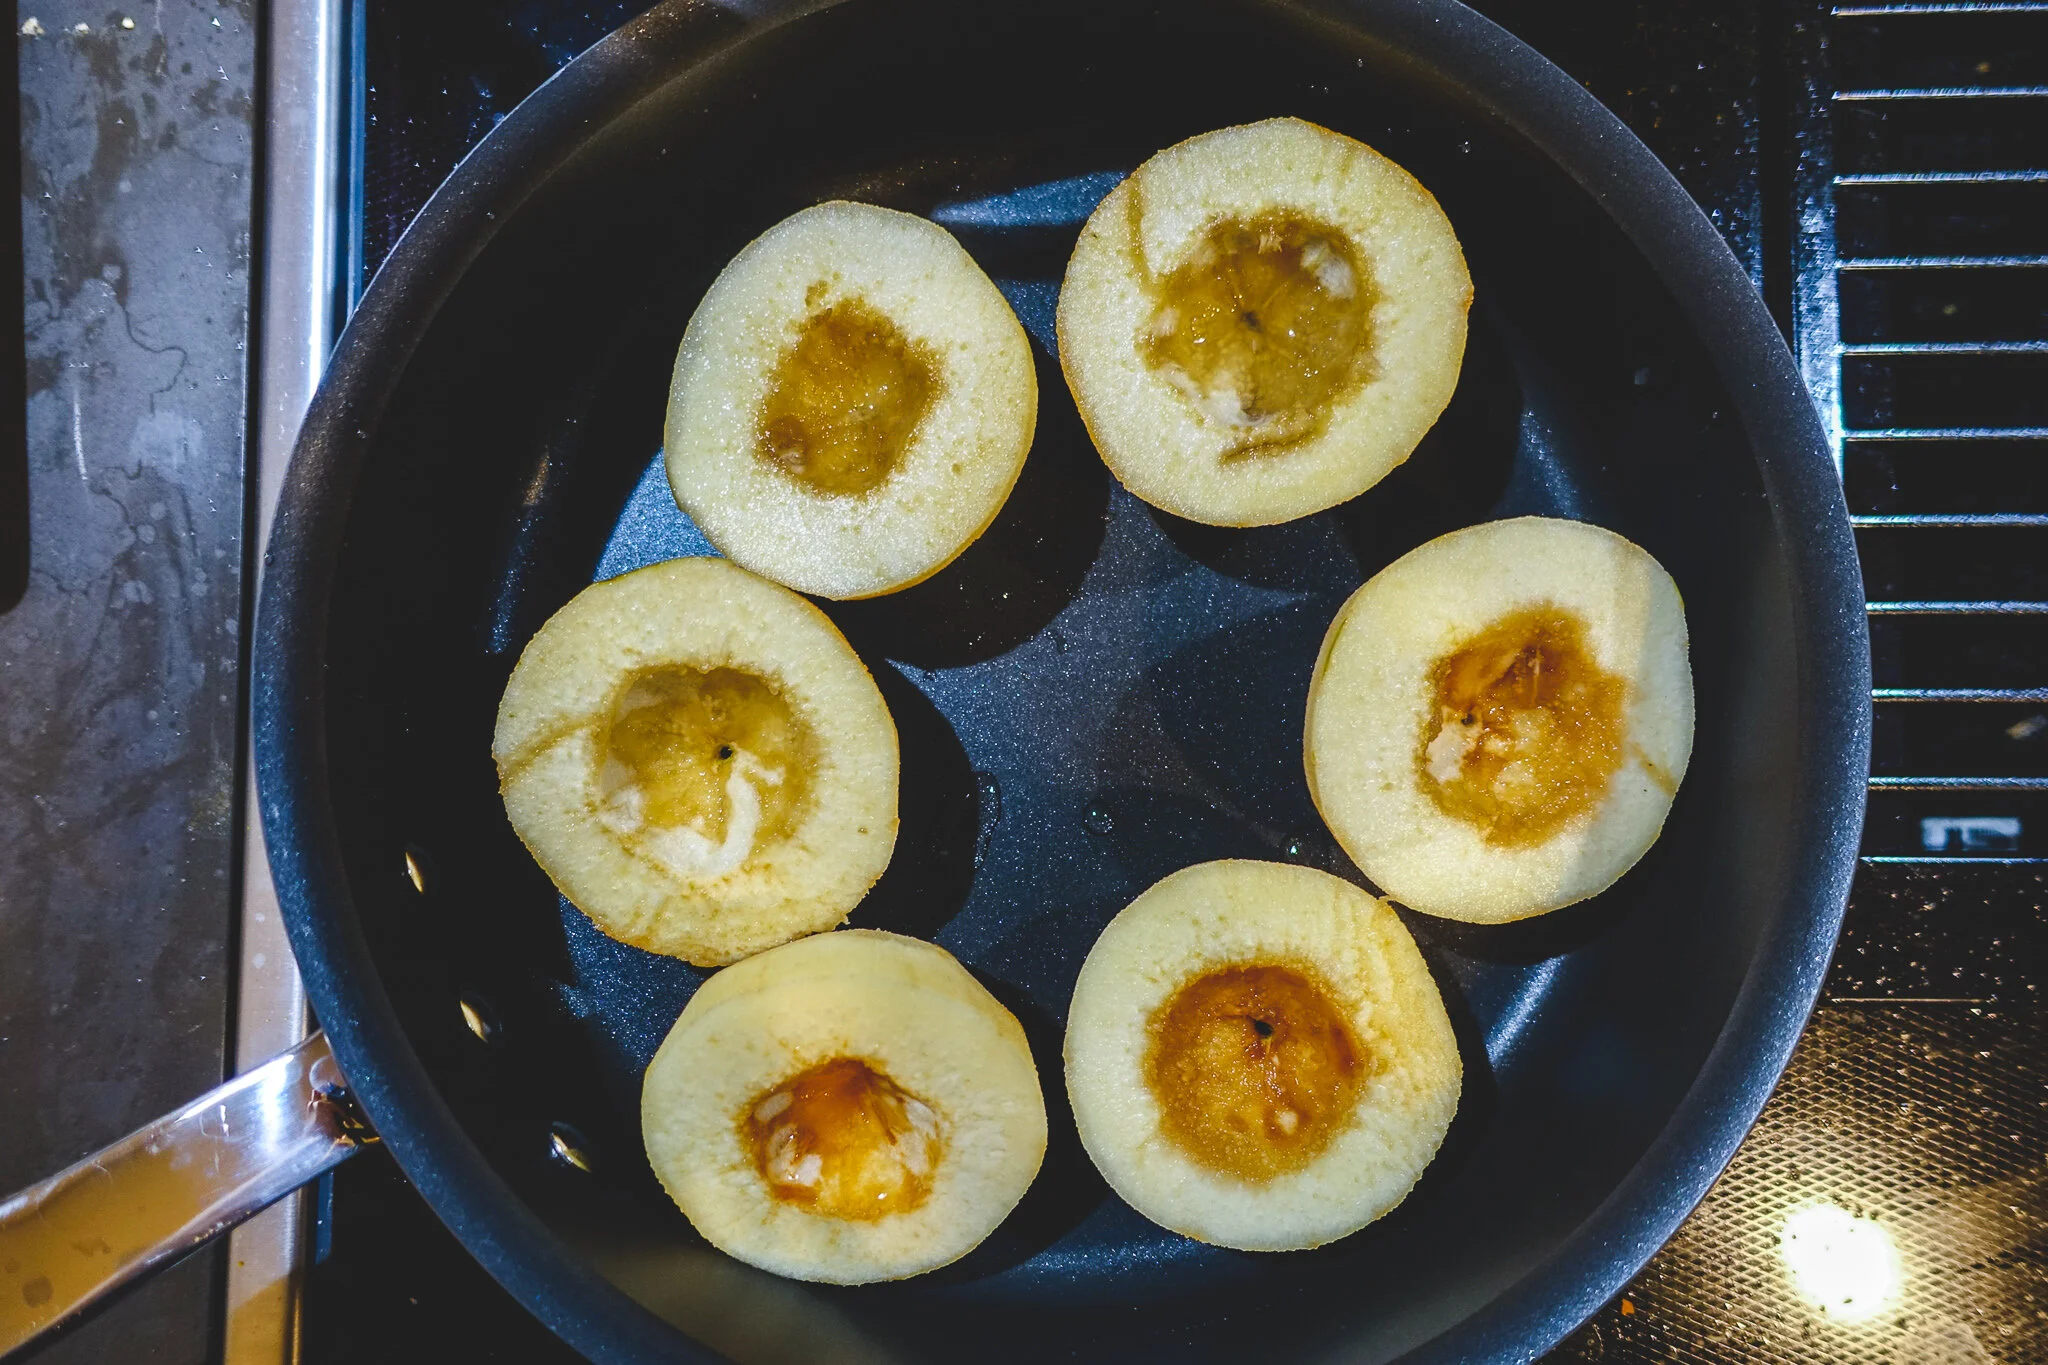
5. Once all the quinces are cleaned, place all the halves into a sauté pan with the carved center facing the top. If they are not standing flat, you can cut a bit to flatten its bottom.

6. Cover each quince with 3 tablespoons of granulated sugar.

7. Add in the cinnamon and cloves.

8. Sprinkle all the quince seeds that you set aside onto the quinces. The seeds help give the quince a deep orange/red color once cooked.

9. Start cooking on low heat. Cook for 30-35 minutes. The sugar and the water are going to turn into a syrupy consistency. You can stop cooking when there is some syrup left in the bottom of the pan. The quinces should get softer and turn a deeper orange in color.

10. Using a spoon, transfer the quinces to a serving platter. Drizzle them with the syrup in the pan. Place chopped walnuts into the carved center of each quince. When serving, place a dollop of crème fraîche onto each piece.

Enjoy!

View fullsize DSC08676-2.jpg
View fullsize DSC08677-2.jpg
View fullsize DSC08678-2.jpg
View fullsize DSC08680-2.jpg
November 08, 2019 /Gizem
quince, fruit
Dessert
Comment
DSC_0037-1.jpg

Summer Fruit Jam, Five Ways

November 08, 2019 by Gizem in Breakfast, Snacks

I grew up in a big city but I spent almost every summer down in the Mediterranean coast of Turkey, staying with my grandparents. My grandparents built a gorgeous white house with a gigantic garden for their retirement. The garden, and calling it a “garden” is definitely an understatement, grew pretty much every fruit and vegetable you can imagine. Strawberries, peaches, kiwis, blackberries, figs, plums, tomatoes, avocados, quinces, beans, peppers, and many more.

I learned pretty much everything I know about plants, soil and food at that garden. When I was 4 years old, I knew every single tree, plant and weed so well that I used to give detailed garden tours to all of our visitors. I learned that earth is bountiful, plants are resilient, animals are resourceful, growing food is lots of sweat and hardwork and that fresh hand-picked produce is unlike any other. Some mornings we had to wake up at 6 am to harvest the strawberries to avoid the scorching heat of the day. Some days we had to get down on our knees and pick weeds for hours and sometimes we just could not compete with the birds that ate all the fruits and learned to let go.

The garden has given my family so much produce over the years and sometimes, it was a little too much to eat. Imagine a house with six (maybe even more) peach trees. If every family member ate 2 peaches a day, we still could not go through weeks worth of harvest before the fruits started going bad. Those were the times when the kitchen turned into a jam factory, filling jars with sweet summer sunshine. Watching the vivid colors of fruit lava bubbling away followed by tasting a fresh batch of jam, spread on a warm slice of bread with butter. So satisfying.  

In Turkish culture, preserving food is a very common practice. We pickle, can and ferment produce, make jams and vegetable pastes, and dry fruits, vegetables and herbs. We use preserved food throughout the year, making up for the cold seasons that are not as productive as summer. Some of these activities, like making large amounts of tomato paste is a group undertaking where every family member has a task. Jam making on the other hand, is pretty easy unlike what you might think.

For this post, I used five different fruits that are still in season (at least in the PNW): peach, apricot, strawberry, blackberry and sour cherry. The best time to make jam is when the fruits are in their peak season. I like to buy fruits from my local farmers market. Farmers know which fruits are at peak season. If they have three types of peaches for instance, I ask them which kind would work best for making jam. Many people think that leftover, almost too ripe, about to go bad fruits should be used to make jam. Your jam tastes as good as the fruits you use. So I always try to use the best fruits for jam, cutting off and discarding any bad bits if there are any.

Tips:

Traditional jam recipes call for 1 part sugar to 1 part fruit. For example, if you have 2 lbs of peaches, you need 2 lbs of sugar. I like my jams to taste like fruit so I use less sugar than recommended. If you use fruits at their peak, fruits will be sweeter so you can get away with less sugar. If your fruits are very sour, such as sour cherries, you can use 1-to-1 ratio of sugar to fruit.  

I don’t like to write recipes that require a lot of special tools. But, in the case of making jam, a kitchen scale and a jar lifter come extremely handy. You need a kitchen scale because it is crucial to weigh the fruits and the sugar to ensure you have a great tasting jam. Without measuring, you can easily end up with an overly sweet, syrupy tasting jam. Kitchen scales are pretty cheap, ranging between $10-20. Here is the one I own. You can also use a kitchen scale to measure out ingredients for making bread and portioning food. Overall, they come handy and you will definitely use it for other recipes. Jar lifters are also useful if you want to be safe while handling hot jars and boiling water. Here is the one I have and they are as cheap as $6.

Always weigh the fruits after they are washed, cleaned and chopped. You might buy 3 lbs of peaches but, once the pits are removed and the peaches are peeled, they might weigh around 2 lbs. Now, if you use 3 lbs sugar thinking that you have 3 lbs of fruit, you are going to have an extremely sweet jam. So to adjust your sugar amount, know the actual amount of fruit you are using.

I don’t recommend making jam with more than 4 lbs of fruit at a time. Not only you need a very big pot, the jam also takes much longer to cook. Increasing cook time might result in burning the sugars and ruining the taste of your jam.

I don’t add pectin to my jams. My family never uses it and we always made amazing jams. Some fruits have pectin naturally and for the ones that don’t, I cook them a little longer. Also, lemon juice naturally has pectin anyways.

Yields: 3 pounds of prepped fruit results in approximately six 8 oz jars of jam. Here are the jars I use. It can be plus/minus one jar, depending on the fruit, so it is always good to have a couple of extra jars just in case.

Time: 12 hours (overnight) + 1.5 hours

Ingredients

1 part fruit

0.75 part sugar

1 lemon’s juice

Preparation

I highly recommend you read the tips section before starting to make the jam.

For strawberry jam:

1. Wash the strawberries. Cut off the leaves. Chop strawberries into halves (or quarters if the strawberries are large). I like chunks of fruits in my jam so I don’t mash the strawberries.

For apricot jam:

1. Wash the apricots. Cut them into halves and discard the pit. Cut the halves into wedges.

For sour cherry jam:

1. Wash the sour cherries. Remove the pits by splitting the cherries using your fingers or if you have one, use a cherry pitter.  

For peach jam:

1. Wash and peel the peaches. Cut them into halves and discard the pit. Roughly chop the peaches into large chunks.

For blackberry jam:

1. Wash the blackberries and make sure there are no stems left attached to the berries. You don’t have to chop or mash the blackberries. I like to leave them whole as they explode and lose their shape when cooked.

2. Put the prepped fruit in a large dutch oven. Cover it with 0.75 part sugar. Basically, if you have 1 pound of prepped fruit, use 0.75 pound of sugar. If you have 1 kilo fruit, use 750 grams of sugar.  You get the idea. Close the lid and let it rest overnight, until the fruits release all of their juices.

3. Next morning, start making the jam. Turn the heat to medium high and slowly stir until the sugar has fully melted. Bring the jam to a boil and reduce heat to medium-low. Be careful with boiling jam and keep an eye on it. If you leave it unattended, it can boil over. Trust me, it is no fun cleaning hot, molten sugar off of your stove.

4. Stir every 5-10 minutes to check on your jam. At this stage, the jam should be simmering and bubbling quite a bit.

5. While boiling, the jam is going to produce lots of thick foam. Remove the foam with the help of a spoon and discard. I check on the foam every 10 minutes or so and remove it. Continue simmering for about 1 hour.

6. While the jam is simmering, sterilize your jars. First, wash them with hot water and dish soap. Then, put the empty jars and their lids into a deep pot. Cover with water, until the jars are fully submerged under water. Bring the water to a boil and simmer for 10 minutes. Turn off the heat, but leave the jars in hot water to keep them hot. This way, the hot jam won’t crack the glass jars.

7. To check whether your jam is ready, take a spoon of jam and set it aside to cool for about 2-3 minutes. You can also pour it on a cold surface like a plate. If when cooled, the consistency of the jam is thick when you run your finger through it, your jam is almost ready. If not, keep simmering for another 5 minutes and check again.

8. Once the jam is ready, add in the lemon juice, stir and boil for another 5-10 minutes. Lemon juice will help thicken the jam and avoid sugars from crystallizing over time.

9. Remove the empty jars and their lids from hot water, using a jar lifter. With a ladle (a funnel helps here), fill the jars, leaving 3/4 inch headroom. Wipe off the edge of the rim of the jar. Cover with the lid and tighten just a little such that you can easily open the jar with your fingertips. If you tighten it a lot, the air won’t be able to escape the jar in the next step.

9. Return the filled jars back into the pot with water. Bring the water to a boil and simmer for 10 minutes. Remove the jars from the pot with a jar lifter. Let them cool on the counter. Within minutes, you should hear a “pop” sound from the lids. This indicates that they are perfectly sealed.

10. Sealed jars can last in your pantry for up to a year and a half. Sometimes I want to have a jar of jam for consuming right away. I don’t bother processing that one jar but I still sterilize it.

Put a dollop of jam on plain yogurt, spread them on biscuits and breads, sauce up your ice cream, add them on your cheese board and serve them with french toast or pancakes. Options are endless. Enjoy!

p.s. Please note that this post uses affiliate links. I only recommend products I love and use.

View fullsize DSC08337-1.jpg
View fullsize DSC08338-1.jpg
View fullsize DSC08492-1.jpg
View fullsize DSC08493-1.jpg
View fullsize DSC08494-1.jpg
View fullsize DSC08495-1.jpg
November 08, 2019 /Gizem
jam, fruit
Breakfast, Snacks
Comment
watermelon-feta-mintandsumac.jpg

Watermelon and Feta

October 31, 2019 by Gizem in Meze, Snacks

Watermelon is one of the most popular summer fruits in Turkey and it is my favorite fruit of all time. This post is not really a recipe but a pairing of watermelon and feta, sweet and salty. When I tell my non-Turkish friends to try watermelon with feta, they generally don't believe that they would go well together.

I grew up eating this for breakfast every summer when I visited my grandparents on the coast of the Mediterranean. On a hot summer day, a cold and sweet slice of watermelon and a salty slice of feta is all you need to cool yourself down. So trust me and try this match made in heaven this summer.

If you want to spice it up a bit more, watermelon and feta is also a commonly enjoyed meze with raki. Raki is a Turkish liquor made with grapes and anise. So pour yourself and your friends a glass and enjoy the flavors, the company and summer nights.

Ingredients

Slices of watermelon

Slices of feta cheese

Preparation

Put the watermelon and feta on a plate and eat as much as you'd like! One bite watermelon, one bite feta.

October 31, 2019 /Gizem
watermelon, feta, fruit, cheese
Meze, Snacks
Comment

Powered by Squarespace